Friday, December 30, 2011

Weddings- Looking Back and Looking Ahead

I have been so blessed to have the privilege to work with so many wonderful couples in designing wedding flowers for their special day in 2011. It is a privilege that I do not take for granted.
I love getting to know each bride and sometimes other family members and yes, sometimes even the groom. From that first meeting until their wedding day, I am reviewing in my mind the color palette, the flowers and special ways to express each couple's style. Sometimes it is with timeless, traditional flowers such as roses and callas.Sometimes it means adding that just right piece of foliage material to set off the rest of the flowers.

Some of my couples want designs that pull together elements from the garden and nature.
I will often step into my own flower beds or go for walks in wooded areas to look for special finds that will be the perfect compliment for her bouquet or maybe his boutonniere...
That will add a bit of spicy fragrance or
or a touch or whimsy
Whenever possible I look for those flowers or vines or pods that will be growing or blooming at the same time each year as their wedding day.
BECAUSE someday these may become the treasures that SHE would want to learn to grow in her own GARDEN and if so... I would LOVE to show her how....
And for 2012... Can't wait to meet and work with all those new couples who are getting married!

Sunday, December 18, 2011

Weddings- Kimberly & Randall

This is such a lovely time of year for weddings! And yesterday was the wedding day for Kimberly & Randall.
I love the excitement of that first meeting with the bride-to-be, and this was so true about meeting with Kimberly. She had a wonderful vision of soft, subtle Christmas whites with touches of cranberry and wine, and accents of a variety of Christmas greens.
There were branches to cut from near and far. Eastern red cedar came home with us from Uncle Ralph's when we visited at the Rea shed for Thanksgiving.
And then there were the feathery blue-greens of Arizona cypress, above, and pungent stems of Rosemary below.
I had dried crested celosia in a rich cranberry red that would work beautifully in the Matron of Honor's bouquet as well as corsages for the mothers.
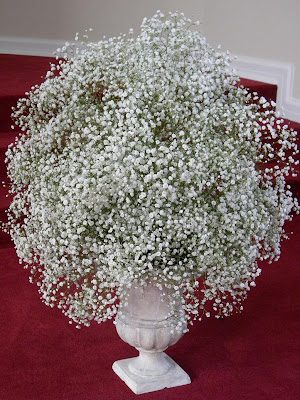
Kimberly wanted the frothy delicate blooms of baby's breath for the ceremony designs.
So two pedestal urns were filled with masses of baby's breath for the front St. David's Chapel in Raleigh.
Pew bows were created with billowy clouds of tulle that encased a single ivory rose with Christmas greens and a touch of baby's breath and holly berries.

In addition to dried celosia flowers, the Matron of Honor bouquet also included dark red spray roses, pink alstromeria blooms and cranberry colored chrysanthemums with seeded eucalyptus, blue cypress greens and touches of baby's breath.
Kimberly's bouquet was filled with ivory Vendella roses and Majolica spray roses, wax flowers, green hypericum berries, seeded eucalyptus, blue cypress and cedar and touches of baby's breath. It was the perfect combination of flowers and greens for the Christmas season.
Now there is a new Mr. & Mrs. Praying God's blessing for you two as you start your lives together.


Thursday, December 15, 2011

Angles on My Wreath

Yes, angles, not angels. This year I was inspired to try something different by a post I read earlier on Botanical Brouhaha about wreaths (February 21, 2011). There were several designs that were square, and I thought why not?
I decided to go a little bit rustic, and use materials from my garden beds. This year the winterberry hollies FINALLY had berries- so of course I wanted to use holly berries.
I also searched out straight woody stems on small trees and bushes in the landscape, and a couple that I foraged on a recent walk.
And I wanted greenery that would really stand out, so I cut some yellow tipped Chamaecyparis or cypress branches (I also used these last week for Abigail and Will's wedding flower designs).
After cutting the branches into 22 inch lengths, I lashed them together with green bindwire.
I also cut some branches into 32" lengths to run diagonally through the middle of the wreath for stabilization, (something I've seen my husband, Wilson, do when he was building a gate).
After the branches were lashed together, I begin gluing in holly berry branches and the yellow tipped cypress. The finishing touch was swirls of red aluminum wire.
I hope my family enjoys the festive touch to the front door.

Sunday, December 11, 2011

Weddings- Jennifer & Christopher

I was so excited when I received an email from my friend, BJ, asking if I could do her daughter, Jennifer's, wedding flowers, but a little worried when I realized that I already had a wedding for that day. But everything worked out beautifully.
Jennifer's wedding was a late morning wedding, and she already had some wonderful family friends taking care of the decorations for the reception. So I did have the privilege of making the bouquets after all!
Jennifer's colors were soft whites and blues of winter. Her bouquet featured a creamy white rose called White Chocolate, white lisianthus (they are beautiful this time of year!), and white hydrangea.
The bridesmaids carried bouquets of blue hydrangeas studded with white spray roses. They were understated and elegant and the perfect compliment to the bridal bouquet.
I am so happy for these two who have joined their lives together as husband and wife, and I am looking forward to getting to know Christopher, who is now the new son-in-law of some very dear friends!!!

Weddings- Abigail & Will

December weddings are cheerful weddings! Churches are all decked out for the Christmas season and there is usually a fresh chill in air. The sky is a breathtaking blue in December, and the sun casts long shadows along the streets and sidewalks. Yes, December is a grand time for a wedding. And yesterday was Abigail and Will's December wedding day.
Abigail came to my studio when the weather was MUCH warmer... August, in fact, which was steamy and hot. Her father and mother and aunt and even Will came with her. I love meeting other family members! We braved the heat to check out some evergreen shrubs that would add beautiful textures and yellowy greens to her bright red and yellow palette.
Chamaecyparis obtusa "Crippsii" or Golden cypress, fragrant Rosemary and a variegated holly-like shrub- Osmanthus heterophyllus are wonderful selections for weddings during the winter months.
And at the last minute, I thought that she and Will might like some berries as well, so I suggested some berried stems from my Nandina bushes (an old favorite for Southern gardens).
The picture above is of one the ceremony pieces for the church. It featured red and yellow roses, yellow button mums and lots of festive Christmas greenery. I was glad that Abigail said yes to the nandina berries.
This piece for the reception included the same flowers with nandina berries and golden cypress as well as fresh rosemary.
When we walked through the garden I pointed out the scented geraniums plants. I thought these variegated leaves would be lovely in this arrangement and would also add a nice fragrance in addition to the rosemary.
The Maid of Honor bouquet was a beautiful gathering of bright yellows with touches of red- Gerber daisies, yellow Babe spray roses and Freedom red roses.
Abigail's bouquet was so lovely! It was designed with red Freedom roses and dainty red spray roses, yellow Gold Strike roses, yellow Babe spray roses and delicately fragrant yellow freesia with a lacy collar of green and gold cypress. Will and Abigail, I wish you all the best! Enjoy the rest of the wonderful season together as husband and wife.

Tuesday, November 22, 2011

DIY for Spring Weddings- Pressed Flowers- Pansies and More

Pressed flowers are a great DIY wedding project, and pansies are a good place to start. But there are so many more flowers that are great for pressing such as larkspur, hydrangeas, even baby oak leaves.
...Be sure to check out the April 26th DIY on pressed flowers for details on pressing.
Here are a few ideas for your flowers once you have pressed them:
Pansies are great for escort and place card settings, and these can be made weeks ahead of time. I use PPA- Perfect Paper Adhesive to attach them and as a top coat to seal them. It's available from: http://www.elizabeths-flowers.com. This is a wonderful site to learn more about pressing as well.
And hydrangeas make a lovely composition as in this framed piece below. The flowers are attached with PPA in a random pattern almost as if scattered by a soft breeze.
And for the nature lover there is this unusual piece designed with newly emerged oak leaves.
You will have to act quickly to gather these little treasures though. They are only available for about eight to ten days in early April before they quickly mature into larger leaves.
So many ways to use pressed flowers and leaves... Next week, I plan to do another post to explain in more detail the "how to" get them on the paper. I would love to hear what you think!


Saturday, November 19, 2011

DIY for Spring Weddings- Think Pansies Part 2

Last post was about using pansies for some special Do It Ahead DIY's for spring time weddings. But to get the flowers, you need to grow the pansies. This post is Part 2 in how to grow pansies in containers.
It's fairly easy to pot up pansies. Start with selecting the colors of pansies that you want, as well as the size. Pansy flower blooms come in different sizes- starting with petite blooms such as Violas, which are an 1" in size, then the Panolas which are about 1 1/2", then the larger blooms that reach 2-4 inches in size. I recommend using blooms that are 2 inches and smaller.
I also recommend using pansies that come in little six packs- they will have time to grow larger over the winter months. Remove the plants from the containers as shown in the picture above. Some of these plants have roots that are pretty full. You will want to loosen these roots before putting them in a new container.
I just take the garden tag that comes with the plants and rake it through the roots, scratching just about 1/8" below the surface- this allows the new roots to move out into soil as they start to grow.
Next take a 9" to 12" diameter pot ( I like to use lightweight resin or plastic pots that won't freeze and crack in the winter) and fill it 3/4 full with a potting soil such as Miracle Grow that already has fertilizer in it.
Now start adding your plants, evenly spacing them around the container.
Once they are in place, finish adding potting soil until you have completely cover all the root balls. Water the container and set it in a sunny corner on your deck or porch or along the walkway. You may want to plant several containers, each with about six plants, so that you will have plenty of spring time blooms.
Keep the soil moist, not soggy, throughout the season, add fertilizer again in February, and come next March, you will have start having blooms to embellish and decorate with. Next pansy post will have some fun ideas for these sweet little flowers and plants!